About Full Stack DR:
Full Stack DR is an Oracle Cloud Infrastructure (OCI) disaster recovery orchestration and management service that provides comprehensive disaster recovery capabilities for all layers of an application stack, including infrastructure, middleware, database, and application.
Objective:
Objective of this blog is to show you how OCI Full stack DR service works with different VMs (Linux and Windows VM) with boot and block volume attached.
Prerequisite:
Prepare primary and secondary (standby) site.
Prepare Linux and Windows VM only on primary side.
Configure required OCI IAM policies for Full Stack DR.
I am using Toronto region as Primary site and Montreal region as standby site.
I have 2 instances ocipsuat01(Windows) and ocipsuat02 (Linux) on primary side.
Steps:
1. Create Object storage bucket in the Primary region and standby region to store DR operations logs.
Create FSDR_storage_primary bucket in Toronto region and FSDR_storage_secondary bucket in Montreal region.
Primary:
Standby:
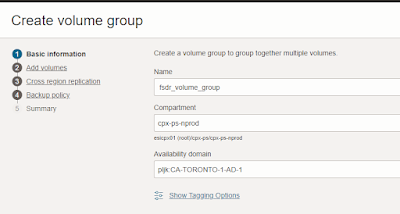
2. Create volume group in Primary region:
Go to OCI console -> Block Storage -> Volume groups -> Create volume group
Click Next and add both volumes (boot and attached volume)
Click next and enable cross region replication and choose target region and volume group replica nameclick next, I don't use any backup policy
click next and check Summary page and click create. volume group will create.
Same way I create another volume group for other compute instance ocipsuat01 (windows VM)
Now I have 2 volume groups for each VM.
3. Create DR protection groups:
Go to OCI Console -> Migration and disaster recovery -> DR -> DR protection group
Click create DR protection group and fill the fields
add primary storage bucket we created in step1, role=primary, peer region = montreal
leave peer protection group and member for now.
Similarly create protection group on standby site:
4. Now we will add members and associate DR Protection groups
Go to Primary protection group -> click members under resources.
and add both compute instances and both volume groups as members.
When we add compute instance as members it will ask to add VNIC so we have to add DR network subnet.
If you see above you can even specify private IP address of destination VM in advance.
same way add other compute instance.
After adding it will show like below
5. Associate DR protection groups and map primary and standby regions.
Go to the primary protection group.
select a Role for the DR protection group.
select a peer region in which the peer DR protection Group resides.
select the peer DR protection group.
Click Associate to associate the DR protection group with selected peer.
6. If we go to standby site, we can see this.
That confirms association completed.
7. Now create a switchover plan in the standby region.
Go to standby site protection group, click on protection group and click on create plan, give a name and select plan type as switchover
Click on plan name and you will see it create a set of built in Plans groups.
NOTE: You can only create DR Plans ONLY in a DR protection group that is associated and has a standby role.
8. Precheck the plan in the standby region now.
Precheck basically validate all the steps in DR plan and the members associated with the steps.
Click on Run prechecks, give precheck name and click Run precheck again.
It will show Queued.
Then In progress
You can expend to see all the steps
soon you will see all precheck completed..
9. Once Precheck successful, we can Execute the DR plan
DR plan will execute all the plan steps now and stopped both source VM in Toronto (Primary) region and provisioned a new VMs in Montreal (standby) region using volume groups we created earlier.
This Blog is specifically for compute instance DR strategy using OCI Full Stack DR but you can add database as member, autonomous database, load balancer and more as a member to use this DR stack orchestration tool.
Hope you like the Blog!


No comments:
Post a Comment