How to quickly deploy a WordPress site using Container Instances in OCI


Container Instance:

OCI Container Instances enables you to easily run applications on serverless compute optimized for containers.

Using Container Instances, you can easily launch one or more containers with flexibility to specify compute shape, resource allocation, networking, and other optional configurations.


How to create Container Instance in OCI

Go to OCI --> Developer Services --> Container Instances --> Click on Create container instance

There are 3 steps in Container instance creation

1. Add basic details

Here we provide the container name, compartment, Availability domain and Fault domain, Choose the shape.


Only 2 Shapes available here CI.Standard.E4.Flex and CI.Standard.E3.Flex, choose the OCPUs and memory for whatever shape we choose. 

I select 4 OCPUs and 8 GB of memory


For Networking part, I already have VCN, subnet so I choose to select those, you can also create new VCN here if you don't have one.


Click Next.


2. Configure containers - Here we can add as many container as we need depend on resources we choose in 1st step. 

I will configure 2 containers to setup this WordPress website (one will use WordPress image and another will use MySQL DB Image)

There are 2 ways to select Image when configure containers in OCI, one using OCI container registry and another using external registry (like docker hub)

So I choose WordPress Image from docker hub and MySQL Image from OCIR registry.

For How to setup OCIR Image, you can see my previous Blog.

All About OCIR

Here I choose WordPress docker Image for 1st container


Add these environment variable as per the Image description on docker hub

WordPress Image


Enable resource throttling and assign 50% resource to this container.


Click on +another container and add MySQL container

This time I choose the Image from my OCIR registry


If registry is Private you have to specify credentials

Now setup some environment variables to initialize the MYSQL database as per Image description.

MYSQL Image


Enable resource throttling and assign rest of 50% resource to this container.

We also need to pass below argument to enable database password authentication plugin


Click Next 

3. Review all the information before create container Instance.


And Click Create, It will take few seconds to launch the container instances


You can see 2 containers each utilizing 50% resources as we setup


So we assigned the public IP to this Instance, using which we can access this WordPress website.

Before that make sure port 80 is open as WordPress site use port 80, so go your security list and open port 80 on Ingress rules.


Now copy the public IP address from Container Instance and hit on the browser and you will see WordPress site is live on internet


I go ahead and select the language and on next screen choose Site title, username, password and your email address and Install WordPress


Next login with your username/password


and Voila! Website is ready


All about OCIR (Oracle Cloud Infrastructure Registry) in OCI

 What is OCIR:

Oracle Cloud Infrastructure Registry, also known as container registry, is an Oracle-managed registry that enables you to simplify your development to production workflow.

OCIR is best used to store Docker images you will utilize in Containerized Applications, such as those that you deploy with Container Engine for Kubernetes.

In this Blog post I will show you 

1. How to create OCIR repository
2. How to push docker Image to OCIR Repository
3. How to pull Image from OCIR Repository


1. How to create repository in OCIR

Go to OCI Menu --> Developer Services --> Container & Artifacts --> Container Registry


Click on Create Repository, give it a name and click on Create

It will create a private repository (You can also create public)


2. How to Push Docker Image to OCIR repository:

To push an image first we have to generate an Auth token, to Generate Auth token

Click on the profile menu --> user settings --> Click on Auth Tokens

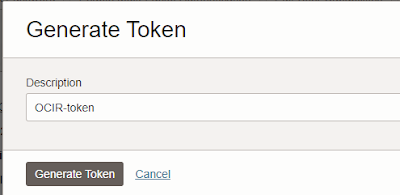
Click on Generate Token --> Give any description and click on generate token


You will see below screen


Copy and save this token somewhere.

Now to push the docker image to OCIR repository, we need a docker environment.

Either you can use docker from your machine if OCI setup is there or else the easiest way is to use OCI Cloud Shell, OCI cloud shell already have docker installed.

Click on developer tool --> Cloud shell 


and I will login into container registry using docker login command

docker login <region_key>.ocir.io

Where,

<region-key> is the key for the Oracle Cloud Infrastructure Registry region you're
using. For example, yyz is the region key for Canada Southeast (Toronto) region. See the
Availability by Region topic in the Oracle Cloud Infrastructure documentation.

username = tenancy-namespace/your username

password = Auth token we generated above


Now time to push my local image into container registry, first check what local images present into this machine. To push local image to container registry I need to Tag the source image first


here is the above tag command we have to give the full path of container target repository where we want to push the image

i.e. <region-key>/tenancy namespace>/ocir repository name

Now check if new image created with new tag and then push the image into container registry


Now check the console for OCIR registry if we have this image present there.


Above you can see we have new image in our container registry now, to see more details about image, Click on Repository and images and click on V1


3. Now how to pull the image from container registry

Before pull the image, let me delete all my local images


Now let's pull the same image from container registry to my local machine

To pull the image copy the pull command from container registry console


Then use that pull command to pull the image to local repository.


Running Oracle database 23c Free release in Docker container

container


I write this blog to test one of the Oracle provided docker image for database 23c.

 
I found it very easy to setup a quick database environment to do some tests. You don't need any virtual machine, Vagrant or anything to setup this.
 
The Oracle Database 23c Free server Container image contains a pre-built database running on Oracle Linux 8, so the startup time is very fast.
This image contains a default database in a multitenant configuration with one pluggable database.
 

Pre-requisite : You should have docker installed on your system.   


Here is the link for Oracle registry where you can find docker images.


Click on Database
Click on free Repository
 
 
You can use below command to pull the image and then run it.
 
  
docker pull
container-registry.oracle.com/database/free:latest
 
Or I used the direct Docker run command and provide variables in the command.

  
docker run -d --name myoradb1 -p 1521:1521 -p 5500:5500 -e ORACLE_PWD=Welcome1 -e ORACLE_CHARACTERSET=AL32UTF8 -v ${PWD}/opt/oracle/oradata:/opt/oracle/oradata container-registry.oracle.com/database/free:latest
 
This command will pull the image and run it.


In the above command
 
container name = myoradb1
Port mapping = 1521:1521
Port mapping = 5500:5500
Set env. variable = ORACLE_CHARACTERSET=AL32UTF8
Set volume = ${PWD}/opt/oracle/oradata:/opt/oracle/oradata
Container Registry = container-registry.oracle.com/database/free:latest

Once this is done, you can see the image using below command.


I used docker desktop on my windows machine, so we can also see the image on Docker desktop
                           
 
Now let me start the container in interactive mode to login into Database.


Connect As you see in my above docker command I used port mapping, so we can connect this DB
from any external tool like SQL developer, toad etc. from laptop


Oracle announced "Ampere A1 Shapes for VMDB" for the BaseDB Cloud Service - Oracle Database 19c on Arm platform in OCI

Last week, June 28th, 2023 Oracle released Arm-based shape for DBCS to use in OCI which support Oracle database 19c.


This is flexible shape let us customize OCPUs allocated to an instance. 

Writing this blog to provide some insight on using Arm-based shape for your DBCS.

If you like to read about what is Arm and why we used Arm processor and what are the benefits, please check below link from Oracle.

https://www.oracle.com/ca-en/cloud/compute/arm/what-is-arm/

Here are the steps to setup Arm shape based DBCS:

Go to OCI --> Click on Oracle database --> click on Oracle Base database Service


Click create DB System --> Provide name ( I used Arm-DBCS)


Click on change Shape and select Ampere (Arm-based processors), We have only one shape available Ampere VM.Standard.A1.Flex shape, its flexible and you can configure OCPU


I choose 2 OCPU


Next Configure storage, Click on change storage

Note: Ampere A1 Shape is only supported on Logical Volume Manager, see below other option greyed out.

Next configure the DB system

Note: Ampere A1 Shape is only supported on single-node DB systems, see below we cant change node count.
Also, Oracle database standard Edition is not supported on Ampere A1 Shape based DBCS.


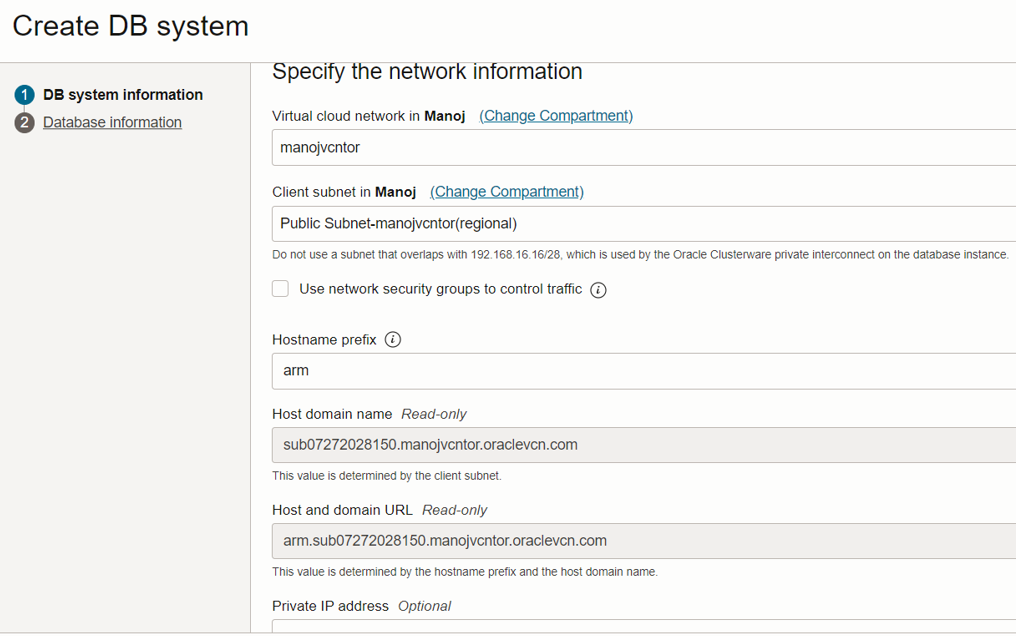
Add SSH keys and network details and click next


Provide DB name ( I used Armdb) and click on Change database Image)


Note: A database software image can not be used for creating database on Ampere A1 shaped DB system, see below I cant select a database version. 


So I have to Choose Oracle database Software Image.


Note: Ampere A1 shape is available for Database version 19c with the 19.19.0.0 and later release updates (RU) only.

Provide database sys password (it will be same for TDE wallet)


Configure Database backups

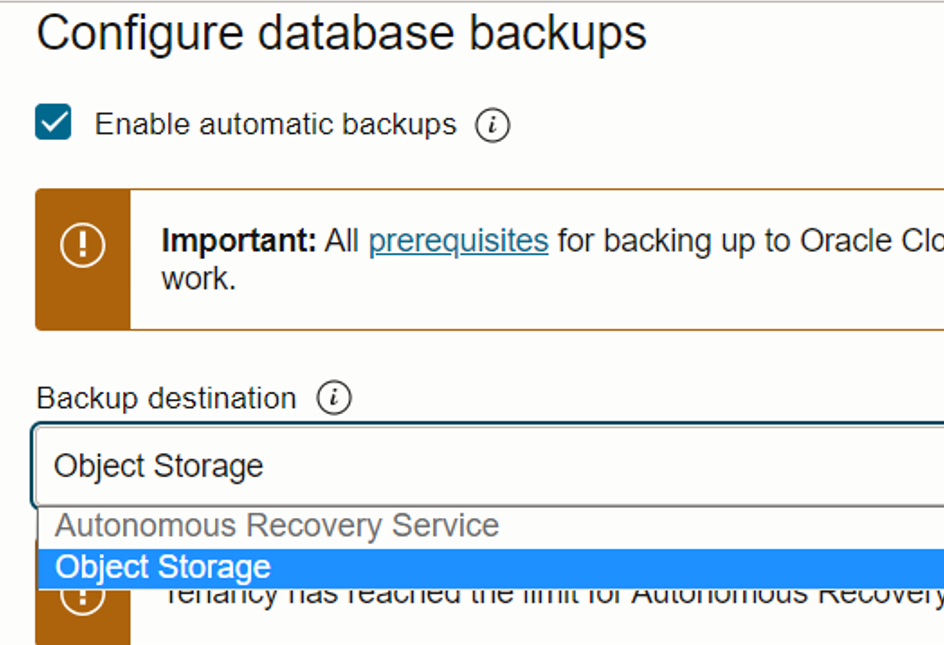
Note: Ampere A1 shape-based DB system provisioning and restoration are not supported if the backup destination for the database is Autonomous Recovery Service. see below I can not choose that option.


For now I am disabling the backups


Click on create DB System, it will take few mins to provision


Once its provisioned, you can see the state available.


Now using private key I can access the DBCS node and check the database, you can see its 19.19.0.0.0


Also, you can see the Processor Info where you see architecture is aarch64 using lscpu output


Here Oracle database is ready and running on Arm based Platform.

There are few important things I like to mention here..

1. The shape of Ampere A1 shape-based DB systems cannot be changed to Intel or AMD shape-based DB systems, and vice versa. see below, I tried to change shape.


2. Ampere A1 shape-based DB systems do not support Data Guard associations with Intel or AMD shape-based DB systems. see below I tried to enable Data Guard but only possible shape in Ampere only.


3. Also, A backup of an Ampere A1 shape-based database cannot be restored on Intel or AMD shape-based DB systems, and vice versa.


Note: Oracle database 19c on LINUX ARM is also available to download now.


Analyze Invoices with Oracle Analytics and AI Document Understanding

OCI Document Understanding is an AI service that enables developers to extract text, tables, and other key data from document files through...